Technical Information
General
All Redicoat® shapes are precision cut from virgin Expanded Polystyrene (EPS) foam using specially built computer-controlled equipment. EPS is a non-toxic, rigid, closed-cell insulation material, white in color, and has a Class 1 rated flame spread of 25 or less. After the shape is cut, a strong reinforcing mesh is applied directly to the foam, after which the surface is machine-coated with a polymer-modified cementitious material that is extremely hard and durable when dry. As supplied, Redicoat® shapes are ready for installation and finishing, and are easily cut and mitered using conventional tools.
Installing Redicoat® Shapes
Redicoat® shapes are typically applied to a stucco browncoat or sandblasted stucco surface. The surface must be clean and dry.
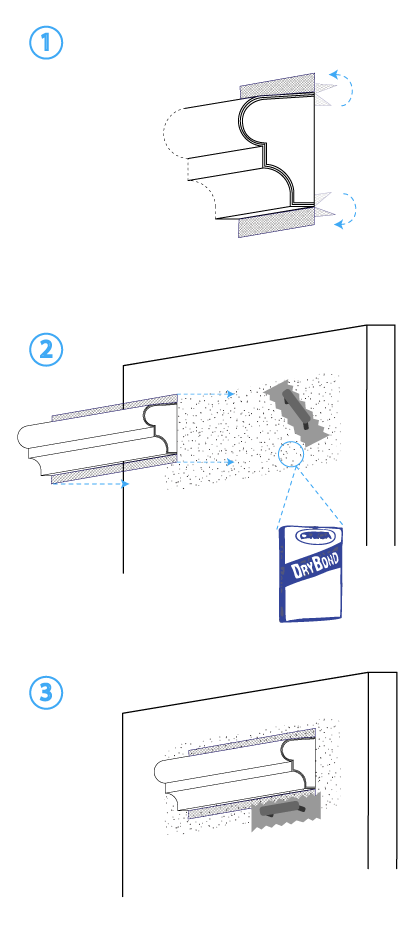
- Unfold the uncoated mesh on the back of the Redicoat® foam molding so that it will lie flat against the wall surface.
- Use a 3/8″ notched trowel to apply a primer-adhesive (example: Omega FoamTek, DryBond or equivalent) to the back of the Redicoat® foam molding and to the surface of the wall 3 to 4 inches above and below where the molding will be applied.
- Apply the Redicoat® foam molding to the wall surface and adjust its position as needed, then trowel the mesh into the primer-adhesive. Larger moldings may require temporary support until the adhesive has dried. Tape or masonry nails are often used, and additional adhesive applied to the substrate may also help.
To join lengths together, use primer-adhesive between the joints. StraightRedicoat® lengths are simply joined end-to-end. For best results, we recommend reinforcing the joint with fiber mesh and more primer-adhesive.
Finishing
Important: Redicoat® should not be left in its natural unfinished state. It must be painted, sealed or coated.
- To Paint: Use any high-quality acrylic paint.
- To Seal: Use a water-based acrylic sealer (example: Omega DecoStone Sealer, which dries clear and can be sprayed, brushed or rolled on).
- To Coat: Always use an acrylic bonding agent (example: Omega Acrylic Bonder or equivalent) when using a cementitious finishing system over Redicoat®. Be sure to follow the manufacturer’s instructions regarding compatibility, mixing, application, etc.
Design Considerations
Redicoat® foam moldings are decorative trim designed for exterior application to stucco surfaces. Intended for non-structural use, they are typically applied over stucco browncoat in new construction or during remodel.
Cautions
- Redicoat® foam moldings are decorative only and are never to be used in structural applications.-
- Redicoat® foam moldings are for exterior use only and are never to be used in interior applications.-
- Redicoat® foam moldings that appear capable of supporting human weight by service personnel should be structurally supported or protected. This is usually done with metal or wood framing.-
- Redicoat® is intended for use as ornamental trim, and not as a primary weather barrier. Installation of Redicoat® should not interfere with the proper function of windows, doors, weep holes, etc.-
- Redicoat® is combustible. Protect from flame or other high heat sources both during storage as well as in application (e.g. chimneys, etc.).
Illustrations within this website are not intended to replace the need for design by appropriate professionals such as architects or engineers.
Because use conditions and building codes may differ from one location to another and may change with time, Customer is responsible for determining whether products and the information in this document are appropriate for Customer’s application.
Advanced Foam, Inc. assumes no obligation or liability for the information in this document.
NO WARRANTIES ARE GIVEN; ALL IMPLIED WARRANTIES OF MERCHANTABILITY OR FITNESS FOR A PARTICULAR PURPOSE ARE EXPRESSLY EXCLUDED.